
It’s always fun to take pictures of a waterfall. It doesn’t matter if the waterfall is small or huge. The movement of the water, the mist around it, and the patterns in the water are amazing subjects to capture. I have 10 suggestions for a variety of creative waterfall photos.
Waterfalls come in endless forms and shapes. Every single one of them is amazing and it can be challenging to photograph it in a special way. It’s more than framing the complete waterfall in one shot. Look for details, the surroundings, and play with long shutter speeds.
If you find a great-looking waterfall, you could spend hours exploring the possibilities. I have ten suggestions that can help you get a variety of creative shots.
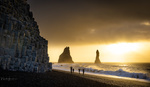
Suggestion 1: Capture the Complete Waterfall

This is the most obvious way of capturing a waterfall. To make it more special than just a regular photo, use a long exposure time with the help of neutral density filters. A ten-stop filter often will do, but if moving clouds are in the frame, a fifteen-stop filter can make a difference.
The long exposure will remove all details from the falling water. Let the waterfall stand out from its surroundings, or at least try to do so. It can offer possibilities for a fine art appearance.
Suggestion 2: Capture the Dynamics of the Waterfall

If you want to see the strength and dynamics of the falling water, a short shutter speed is necessary. There is a variety of shutter speeds possible, and it all depends on the type of waterfall which works best. There is also a personal preference to take into account.
An extremely short shutter speed will show a lot of water droplets and lots of details in the water. But be careful not to freeze the movement completely. Experiment with a range of different settings and find the most optimum one.
Water droplets can stand out with backlight. However, this may be difficult. It depends on the ability to move around and take the right standpoint.
Suggestion 3: Capture the Details of the Waterfall

Always search for details. Especially if the water runs over rocks and mosses, there are tons of details. There are patterns and shapes to be found. You can use these for your composition and to guide the attention toward a certain point or subject in the frame.
Use a polarization filter to get rid of the light reflection on wet surfaces. It increases the contrast between the water, mosses, and rocks. It will also bring out the colors. Find the best shutter speed to get nice streaks and lines in the water.
Suggestion 4: Use a Foreground Subject to Capture the Waterfall

It’s not always necessary to use a waterfall as the main subject. If there are interesting foreground subjects, change the focus toward these subjects and use the waterfall as a backdrop. Use a longer focal length to create a shallow depth of field.
The limited field of view of a longer focal length also offers the ability to fill the background, even with a small waterfall. A longer shutter speed can create a curtain of water in the back. Just be careful of any movement of your subject.
Suggestion 5: Let the Water Come to You

Use the water stream that flows from the waterfall as a guiding line toward the waterfall. For these compositions, a vertical orientation can help you to get a balanced division of elements in the frame.
For these compositions, it’s not always necessary to capture the complete waterfall in the background. However, if that’s your wish, it’s easier to get everything in the frame if you choose an ultra-wide angle. In that case, use the maximum depth of field to get everything within acceptable sharpness. If that’s not possible, turn toward focus stacking.
Suggestion 6: Capture the Waterfall in a Bird's Eye Perspective

A bird's eye perspective offers a unique way of capturing a waterfall. It not only allows capturing the water falling down, it also enables you to show the way the water flows.
By viewing the waterfall from a high perspective, you can use the waterflow as a guiding line through the frame. Sometimes it’s enough to stand at the top of the waterfall.
If there’s a bridge over the waterfall, use it. However, if it’s allowed and possible, use a drone to get a true bird's eye perspective. Rotate the composition in a way that the water is flowing in a nice direction within the frame.
Suggestion 7: Capture the Flow of the Water

In most compositions, the water is flowing toward the edge of the frame. It can be a struggle to force your attention against the flow of the water.
Choose to capture the flow of the water as it runs toward a subject at the horizon. This way, the viewing direction is guided by the direction of the water itself. It feels more natural. However, it’s wise to have a subject at the place where the water flows toward.
Suggestion 8: Use Amazing Light Through the Mist

There can be a lot of mist at a waterfall. Use this mist to your advantage. However, it can become truly amazing if it’s possible to catch the sunlight shining through the mist.
Find out how when the light comes from the best possible way. Of course, this is not possible with every waterfall. But it’s worth looking into the possibilities. If you are able to visit the waterfall at the appropriate time, take that opportunity.
Suggestion 9: Finding a Rainbow Next to the Waterfall

If there is mist at a waterfall, and the sunlight is coming from the right angle, you might see a rainbow. At large waterfalls, with a huge amount of mist, it’s even possible to see a double rainbow.
Always look at the position of the sun during the day. This makes it possible to plan the position of the rainbow relative to the waterfall. If there is a full moon, you might get lucky and capture a moonbow.
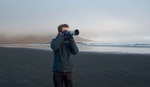
Suggestion 10: Take a Dish Towel With You

Photographing waterfalls can turn out to be a challenge. Water spray and mist can ruin your photo if it gets onto the lens. The best way to dry the lens is a dish towel that has been washed a couple of times.
A dish towel allows you to position the camera in places that otherwise wouldn’t be possible. Dry the lens after every photo and take multiple shots. Since droplets will be visible in different places in the frame, it becomes possible to combine more than one shot to get rid of the drops in the frame.
Do You Have More Suggestions?
These 10 suggestions can help you to achieve a variety of interesting photos of a waterfall. But this is not limited to these ten suggestions. If you have more suggestions, please share them in the comments below.


Suggestion 11: Go to Iceland :-)
Suggestion 12: Go to the Faroe Islands after a few days of rain
Suggestion 13: Try for once short exposures instead of trendy but slowly boring long exposures result can be surpriceling different.
That's what I mentioned in tip 2