In this article, I share five photo editing techniques in Photoshop you can use to create better night photos.
I already covered the in-the-field process of taking night photos in another article. There, I explained how to use time blending to achieve high-quality results. But I didn't share how to edit those photos. It requires the blending of images taken under very different lighting situations. While I capture the night sky during astronomical twilight or at night, I photograph the foreground during blue hour.
The first step for a successful blend of such images is to get the color temperatures to match during the raw processing stage of the edit. It also helps to darken the blue hour photos and make them look more like night photos. But make sure to keep a hint of detail visible in the foreground. You can use the "Temp," "Exposure," and "Shadows" sliders in Lightroom for it. You use the latter to preserve detail in the dark tones while using the "Exposure" slider to darken the overall image. It might also help to slightly reduce the saturation because, at night, colors are usually much less vibrant.

The main work has to be done in Photoshop, though. In the feature video, I go through the different steps and share the best way to edit night photos for me.
Clean Sky
During the blend I show in the video, I take a large portion of the sky from a photo taken during twilight. At that time, exposure times often range from 30 to 60 seconds if you shoot at low ISO. That's enough to create slight star trails for the few stars still visible in the sky. A plane moving by will also produce a visible trail.
A quick way to get rid of those trails is the "Dust & Scratches" filter, which you find under the "Noise" filters. First, zoom in to 100% on the most prominent trail you want to remove. Then, set the "Threshold" to zero and slowly increase the radius. A value between 10 and 20 should usually do the trick.
Next, use the "Threshold" slider to bring back some details. I usually keep that value below ten and use masking to selectively apply the filter. This way, you can remove tiny spots and trails much quicker than through cloning.
In the next video, I show an additional use case for this awesome filter.
Glowing Stars
With Lightroom's AI noise reduction, you can get a sufficiently clean image even when shooting at high ISO. In the feature video, I show how good a photo at ISO 6400 looks after some adjustments in Lightroom. But there's usually still some noise left.
With the following trick, you can remove it while giving the stars in the photo a nice glow. It looks great for twilight-star photos. For a real night photo with many stars, on the other hand, this technique is not suited that much. But you can always give it a try and see how it looks:
-
Duplicate the layer you want to use for the sky - the photo taken at night that shows most of the stars.
-
Set the layer blend mode of this duplicate to "Lighten."
-
Blur the underlying layer using "Gaussian Blur" with a value of less than 10.
If this still sounds strange to you, follow along in my tutorial video. It will make much more sense.
Perfect Sky Selection
I have a separate article on creating perfect sky selections by using a mix of AI, mask refinement, and dodge and burn. The technique I share in this article comes in very handy during the time blending of night photos.
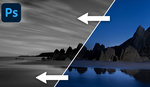
It's essential to create a precise selection of the sky. You use it to combine the night sky with the foreground from the blue hour photos. It will look horrible at first, and you will have a harsh contrast at the horizon. But there's a remedy for it.

Convincing Blend
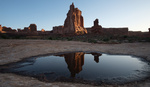
A good selection alone is just the preparation. The most important part of editing a photo like the one above is making the blend look convincing. By working with "Curves" in Photoshop and darkening the foreground layer until it's nearly completely black, you create the most believable result - seeing nothing in the foreground is realistic for a night scene.
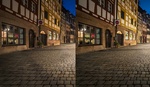
But it's boring. After all, why did you take the photos during the blue hour in the first place? You did it to now selectively reveal areas by painting with a black brush at low opacity in the mask of the "Curves" adjustment layer. Go slowly and gradually bring back details. Try not to go too far to achieve the most convincing results.
Here, it helps to work in a slightly darkened environment. Then, you can better preserve the dark look that suits night photos.
Clean Foreground
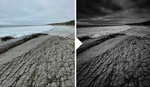
The two example photos in this article show pristine dunes. They are also very dark, and the tonal range for the shadow areas is reduced. That's why it is even more important to clean up the foreground and create smooth transitions in the shadows. You can use the advanced cloning technique I shared in this article. A mix of cloning, frequency separation, and selective blurring of the low-frequency layer works wonders on such desert photos.
Be careful with the blurring, and don't apply it to edges. It will create noticeable artifacts. It works best for flat, structured areas.
Conclusion
You can achieve high-quality results by creating night or twilight photos using the techniques I showed above. The images will be detailed enough for even larger prints, and the noise minimal. For ultimate quality, use focus stacking for the blue hour photos and image averaging for the night photos. There are free tools like Sequator that can do the averaging in seconds. You can reduce the noise in the sky significantly with it and make photos taken at ISO 6400 look like images captured at ISO 100.