“Philly is Ugly” is a timelapse photography project by Philadelphia area photographer, Nathaniel Dodson. He took an impressive amount of time to not only create this short film piece, but also to extensively document his behind the scenes process. When he sent this to me, I couldn't help but share this with you. In addition to the video, he provides a lot of info to help you learn everything that goes into creating a proper timelapse from pre-to-post production.
How This All Came Together:
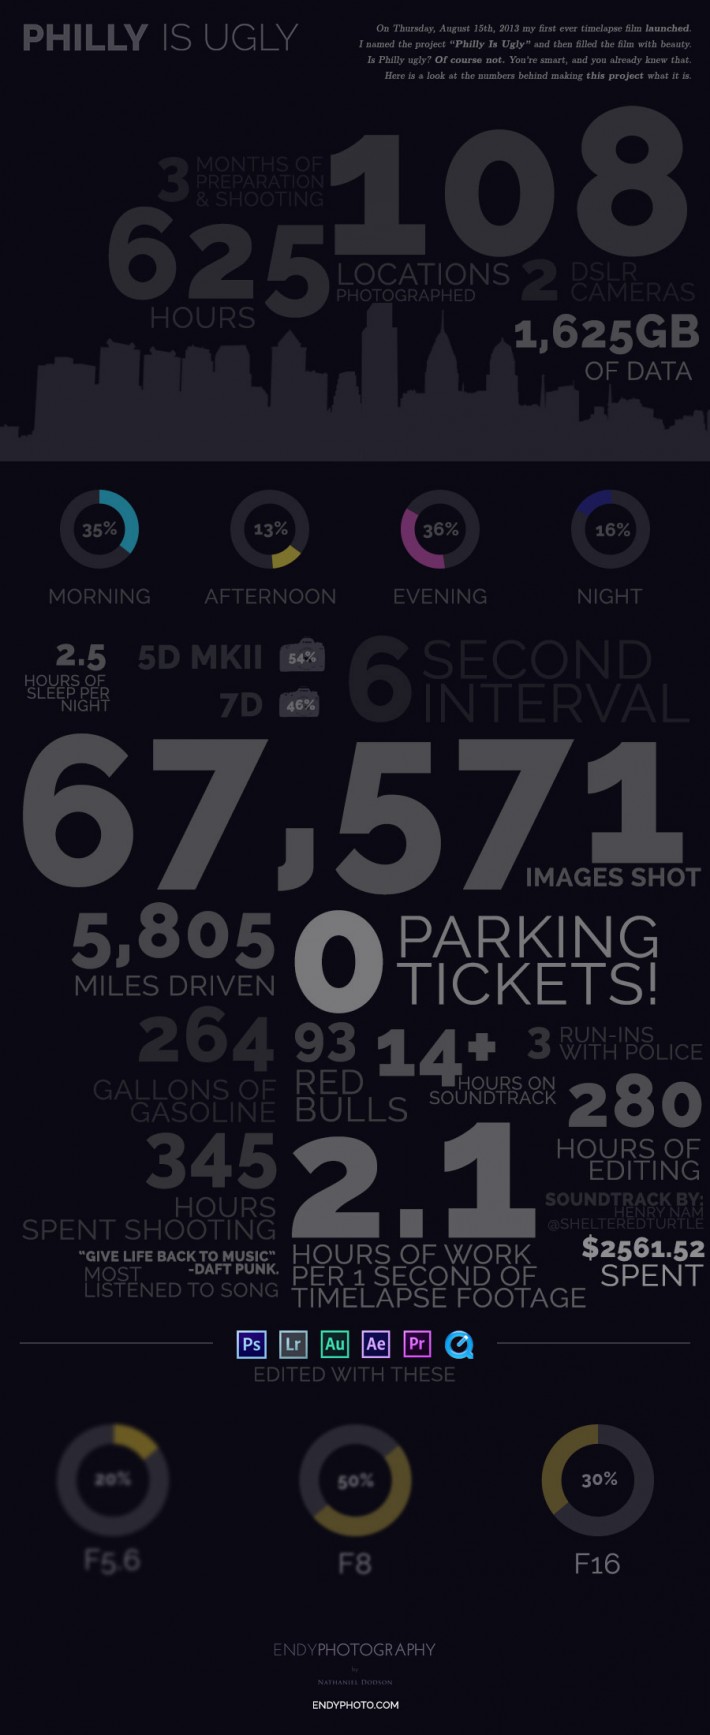
I got the idea for the “Philly is ugly” time lapse film project in mid-late May of 2013 and immediately started thinking about how I could pull this together and create the best time lapse film this city has even seen.
The name “Philly is ugly” came about as I was casually thinking of some funny or interesting names for the project. I did not want to give it a cliche, or “fluffy” name like “Philly Lights”, or “Philadelphia is Beautiful”, or “Philly, Philly, Philly, Vanilly”, well maybe not that last one, but I knew I wanted to do something different, something that would punch you in the mouth. The more I thought about the name “Philly is ugly”, the more I loved it. “Philly is ugly” will make both those who love and those who hate Philadelphia (surely there isn’t anybody like that out there!) turn and look at the film. If I did my job, the film will show everybody just how beautiful Philadelphia is. It was mildly terrifying sticking with the name, but once I bought the domain name, there was no going back! You will never influence the world by trying to be like it. Step out and do something different. Be daring.
Inspiration for this project was an evolving thing. As I found new locations, I thought of new and interesting angles to shoot. A healthy dose of other timelapse films, and websites like http://flickr.com and http://500px.com and http://pinterest.com all provided interesting still photos of unique and beautiful angles of cities around the world that I would try to mimic here in Philadelphia. Getting a great still photo is the first step to getting a great video frame.
Location Choices:
I color coded my Photoshop map of Philadelphia with new pins. The cyan pins are locations best suited for morning shooting, yellow pins for afternoon shooting, pink pins are best for the evening, and purple pins are best for night shots. Armed with this I set two or three locations a day in my schedule, six days a week, for 8 weeks straight. I had spent 5 weeks preparing and shooting could now begin. Check out the map below.

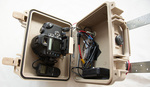
Camera Settings & Gear List:
Camera settings depend on the light of the location and the look of image you want. Normal principles would apply (i.e. Shallow depth of field means a wide open aperture, or slow the shutter to blur and smooth movement, or shoot at f16 for star shaped headlights or street lights, etc…) just as if you were shooting one image. The one difference is that I would underexpose in the mornings to account for everything getting brighter while I was shooting the sequence and I would overexpose in the evenings to account for everything getting darker. A quick general settings run-down and video about shooting is below.
Shoot in Raw.
White Balance 6000K.
Manual Focus.
Shutter: 1/20th
Aperture: f6.3
ISO: 100
Intervalometer: 300+ photos at a 6 second interval.Canon 5D MK II
Canon 7D
Canon 24-70mm F2.8L USM Lens.
Canon 70-200m F2.8L IS USM Lens.
Canon 17-40mm F4L Lens.
Canon 50mm F1.4 Lens.
2x Manfrotto Carbon Fibre Tripods
4x SanDisk 16GB Compact Flash Cards.
4x SanDisk 8GB Compact Flash Cards.
2x Intervalometers (Vello Shutterboss Version II Timer Remote)
0.3 and 0.6 Neutral Density Filters.
Umbrella & Plastic for rain protection.
Here are only a handful of the behind the scenes videos he put together for this project!
- - - -
You should definitely check out Nathaniel's extensive behind the scenes page as well: http://endyphoto.com/bhts-philly/
Check out more of Nathaniel's work here: http://endyphoto.com/


I enjoyed the bulb ramping section since having a true day-night timelapse (or reverse) is truly a pain in the butt if you don't plan it ahead or just put the camera in manual mode. I think this will work if you manually change the settings too every 20 pictures once the light starts going down.
Agreed, never thought of doing it in post. Always thought it was done in camera.
Thanks! I was just flying by the seat of my pants and trying to make it work :P
I've been trying to get a solid sunrise timelapse for quite a while now and I've tried a number of methods including manually adjusting settings and using the bulb ramping feature in Magic Lantern. This is definitely the most frustrating and discouraging factor of shooting timelapse. But a few months ago I stumbled upon an application called LR Timelapse. It works side-by-side with Lightroom and allows you to animate elements of the timelapse to compensate for drastic changes. It also has an incredibly effective deflicker function that makes timelapses look much smoother.
If you shoot a lot of timelapse this is definitely worth purchasing or at least working with the evaluation version for a little.
Website is www.lrtimelapse.com.
Also, Nathaniel superb job on the Philly is Ugly timelapse! There's not too many Philadelphia timelapses of that caliber out there.
Beautiful work, Nathaniel! On the film as well as the many tutorial and bts videos. As your first time-lapse project, this is extremely impressive. A suggestion for whenever you're shooting through glass: check out Lenskirt.com. Might be the most useful $50 you'll ever invest in camera gear.
Oh yeah. That looks very useful! Thanks for sharing!